If you're coming to Webflow from other frameworks that have built-in tooltip handlers, you might wonder how do I display tooltips on my Webflow site?
Natively with Webflow, you could create tooltips with IX2 interactions. There is an excellent blog post describing how you do it with IX2 here -> https://webflow.com/blog/how-to-build-tooltips. If you follow along, it seems like much work, just for tooltips. I did too.
Well, you are not limited to using just interactions to create tooltips. There are lots of ways to do this with custom code. On other custom sites I have built, I have used jQuery UI. It's pretty heavy, but cross-platform support was excellent, and it had lots of other widgets. jQuery UI has great section 508 compliance support as well.
I was looking for something a little lighter, yet was still flexible enough for most cases while being easy to deploy and use.
The Tooltip Solution? Tooltipster
Tooltipster is described by its author as;
A flexible and extensible jQuery plugin for modern tooltips.
Simple enough for everyone, powerful enough for everything.
I agree and it is free. Can you use it on commercial projects? Yep. Thanks to these fine folks.
Developed and maintained by Caleb Jacob and Louis Ameline under the MIT license
GitHub - calebjacob/tooltipster: A jQuery tooltip plugin
It's Custom Code
Anytime you want to use custom code on a Webflow site; you need a plan that supports it. That would be a paid plan, any paid plan. Is it hard to implement and use? I don't think so. However, you should at least have a sense of what is happening and understand that if you have problems, you need to take responsibility. READ THE DOCS!
Implementation
You can grab a CDN version of tooltipster from jsDelivr.com, for use on any site. You can copy the script tag below and from inside the Designer, open the page or site settings, enter your code in the before body close code section, and save the settings. See instructions at Webflow here. Why does it go down below? Because it is dependent upon jQuery loaded. On Webflow, jQuery is loaded right before the code you put in the "before body close" custom code area.
The link below is for whatever is the current release. If you need to control what version you need to use you can do that with jsdelivr. Go to the project for releases.
<script src="https://cdn.jsdelivr.net/npm/tooltipster/dist/js/tooltipster.bundle.min.js" integrity="sha256-glChvCaC6IJq49dkfulAWd7xlkPwA0FEydjhjPBintA=" crossorigin="anonymous"></script>Note: You only need it on pages where you are trying to render tooltipster tooltips. If that is everywhere, then it goes into your project settings custom code.
Some of you might notice the integrity attribute in the script tag. That is called Subresource Integrity (SRI). I use it. Webflow did as well with the jQuery load. Whether you do is up to you. You can read about it at https://developer.mozilla.org/en-US/docs/Web/Security/Subresource_Integrity
Next, you need to initialize tooltipster so that when it finds the class of "tooltip" an element, it then looks for the "title" attribute and value of the element and displays it. That is how it works. A little bit more on that further down the page.
We want the code to load after the document as loaded and is ready. So we are placing the code inside a jQuery document ready function.
<script>
$(document).ready(function() {

   // first on page load, initialize all tooltips
   $('.tooltip').tooltipster();

});
</script>
Code block placed in the before body close area
Theme
Toolstipster has built-in theming. We are going to use the default. For the tooltips to be visible, we need to load the default CSS provided with tooltipster.
We get it from the same CDN.
<link rel="stylesheet" href="https://cdn.jsdelivr.net/npm/[email protected]/dist/css/tooltipster.bundle.min.css"
integrity="sha256-Qc4lCfqZWYaHF5hgEOFrYzSIX9Rrxk0NPHRac+08QeQ=" crossorigin="anonymous">
Placed this link into the custom code area before body (HEAD)
Place the link block into the document head.
If you followed these steps correctly, you are ready for the next step -> activation.
Activating Tooltips with Tooltipster
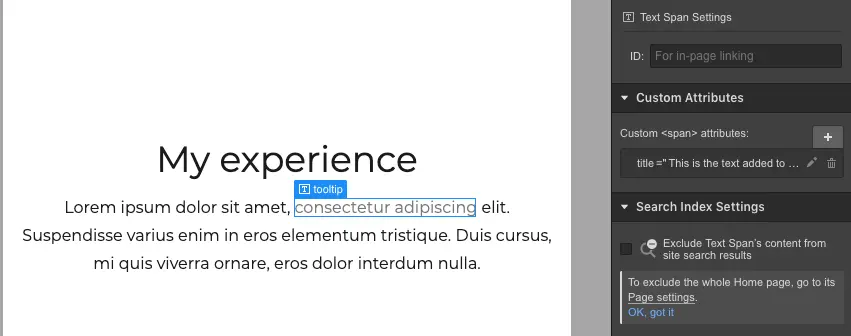
As I mentioned before, tooltipster code is looking for any element with a class of tooltip on your page. Examples of use are typically a span element in a block of text.
The text for the tooltip is coming from the value of the "title" attribute added to the span.

Adding the custom attribute "title" with a value.
Can you use this technique on other things? Yes. Here is an example of adding a tooltip to a link block that has an image as its child.https://www.youtube.com/embed/7wpaQMi7vGQ?feature=oembed
Here is a read-only Webflow project configured with tooltipster
tooltipster.webflow.io Read Only Link
Tooltipster Demo published link
Go Play With a Pen
What's Next?
That is up to you. If you are stuck, please read the documentation.